Home
Showing posts with label Tutorials. Show all posts

Wednesday, February 1, 2012

Make a Felt Heart Puzzle: Guest Blog Post!


Today's Tangram-esque Heart Puzzle Tutorial comes to us from Jen of An Evergrowing List. Jen is my first guest blogger, so please make her feel welcome :)
Take it away Jen!

. . . . . .
I have had this on my pinterest for awhile now but haven’t gotten the time to make it happen. With Valentine’s Day coming up fast I figured I’d make a heart version first.
After browsing the internet a bit without coming up with anything I liked I made my own pattern (and a tutorial for you). This project can be done very simply with no sewing or a bit more complexly with some sewing involved. Choose your own adventure!
Materials:
red felt (or a color of your choice)
printable pattern
scissors
chalk
sewing machine (if sewing)
red thread (if sewing)
Directions:
Print out the pattern. You can enlarge it or make it smaller depending on your wants and needs.
 

I made a sewing allowance around each piece only to realize later it wasn’t necessary. Oops! You can see in this picture the pieces I end up combining.
 Cut out the pieces. I ended up combining some of the smaller pieces to make it easier for myself to make and my son to solve (he’s 3). You can do the same or keep it the way it is.
I realized here that I only needed to cut out one of each shape since some of them repeated. I made sure to write on the pattern how many I would need of each piece. Since I sewed mine I made 2 of each pattern piece.
Using the pattern pieces as a guide, trace around each piece with chalk onto your felt. If you plan on sewing the pieces make two of each piece to sew together. Cut out all the pieces from the felt.

 If you don’t plan on sewing you’re done! Put the pieces together in their heart shape and enjoy.


If you plan on sewing match each of the pieces into pairs. Sew almost around each shape leaving room to turn them inside out.

You can see here how much room I left to flip the pieces inside out.
 Flip each piece inside out using a chopstick or pencil to push out the corners. Iron each piece on the polyester setting to insure your felt doesn’t stick to the iron.


Sew all the way around each piece or close the pieces with a blind stitch. You’re finished!


 My son has really enjoyed trying to make the heart puzzle as well as making other shapes with the pieces. I hope you enjoyed my tutorial and come check out more at my blog, An Evergrowing List!

Wednesday, June 2, 2010

DIY: Decoupage with Peacock Feathers


Wandering around the craft store feeling unispired, my crafty cousin suggested I try decoupaging with peacock feathers. "Can you do that?", I thought... Well apparently you can! If you want to give it a try for yourself, you'll need the following:

Canvas or wood block
Acrylic paint for the background
White glue or Modgepodge (I used white glue)
Foam paint brush
Peacock Feathers
Spray Polyurethane

Process:
1. Paint the canvas with a color that compliments the feathers. I chose a dark brown. Let dry.

2. Spread a thin coat of glue or modgepodge in the area you are going to attach the feathers.


3. Gently press the feathers into place, wrapping them around the edges of the canvas for an interesting effect.


4. Gently dab glue on top of the feathers. Repeat and let dry.
5. Spray with a coat of polyurethane to seal. Enjoy!

Monday, May 24, 2010

DIY: Jar Candles


I've been buying jar candles lately. I like them because you can close the lid and not have to smell the smoke of blowing out the candle. Well, this weekend I decided to make my own. Here's how you can do it!

What you'll need:
jar and lid for the candle
wick material (available at craft stores)
old half bunrt candles you have lying around the house (or new wax from a craft store)
tissue paper to decoupage the lid
modpodge (available at craft stores)
foam paint brush
scissors
pencil
bamboo skewer (or something else you don't mind getting covered in wax)
oil for scent (I used food grade almond oil)
sauce pan
old jar or can to melt the wax

Process:
1. Melt the wax using a double boiler. I used old candles that were either half melted or in a style I didn't like. Place the wax in an old jar or can and set in a sauce pan. Fill the sauce pan with water and bring to a boil. Stir the wax as it melts using a bamboo skewer.


2. Once the wax is melted, add your scent and stir with the skewer. Be sure to use an oil based scent not a water based scent so it will mix will the wax. I used a few drops of almont oil, though next time would add more to make it smell stronger.

3. Carefully pour the wax into your candle jar using a hot pad or oven mitt.

4. Immediately place the wick material in the wax and position it by wrapping around a pencil. Let wax harden overnight. Cut the wick down to a few centimeters above the wax.


5. Decorate your lid with decoupage! Thin paper (like tissue paper) works best. Let dry for a few hrs.


6. Enjoy or give as a gift!

Monday, March 8, 2010

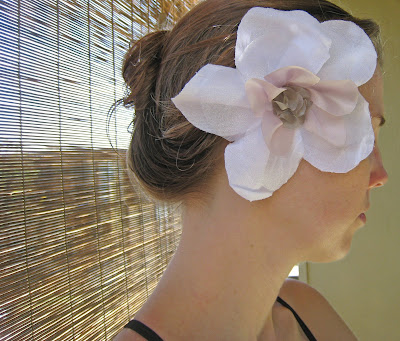
Tutorial: Make a Flower Hair Clip with Fabric Scraps


Still on my flower kick, I put together this flower hair clip using scraps of material and fabric glue. It's super easy!!! (ignore my messy, freshly washed hair :)

Materials:
Fabric Scraps
Fabric Glue
Hair Clip
Scissors

Process:
1. Cut out the petals. For this flower I used 3 layers of petals. You will need 5 circular pieces for each layer. I made the largest layer of petals using pieces about 2.5 inches in diamter, the second about 2 inches in diameter, and the 3rd around 1.5 inches in diameter.
2. Cut out a base to attach the flower. Use the same fabric as the largest flower, but reduce the size to about 2 inches in diameter.
3. Glue the petals to the base fabric, pinching one side of the circlular fabric pieces. It's basically the same process as the paper flower tutorial and fondant flower tutorial. Let me know if this doesn't make sense.
4. Repeat the process for the next two layers.
5. Make the center of your flower. This will hide any glue used to attach the petals. You can sew on a button or some beads or use more fabric. I crumpled up more fabric circles about 2 inches in diameter, gluing carefully as not to let any glue show.


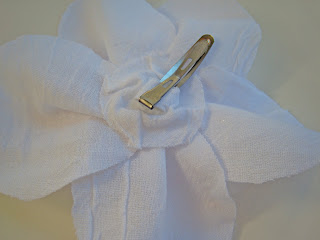
6. Cut out a strip of fabric about 3/8 in wide and glue to the back of your flower. The loop should be sized so that your hair clip will slip in and fit snugly.


Want more ideas for things to make with fabric scraps? Amy from Craft Chi gives you plenty more. Found via Craft Gossip.

Monday, February 22, 2010

Tutorial: Gift & Favor Boxes with Pretty Paper Flowers


Armed with a round paper punch and lots of great papers, I was looking for a new craft idea. I ended up with the paper flowers above which are perfect for embellishing gift or wedding favor boxes.

Materials:
Gift Boxes
Various Round Paper Punches
Scrapbooking paper in the color of your choice
Hot Glue and Hot Glue Gun
Exacto blade and tweezers

Process:


1. Punch out 5 circles for each flower. I made three sized flowers, the smallest with a standard 3 hole punch and the largest using a 1.5 diameter inch punch.


2. To make the petals, gently fold each circle and pinch one side to make a crease.


3. Layout the petals on a piece of paper to get an idea how you will arrange them before gluing.

4. Glue each petal on to your gift box. Use the blade and tweezers to clean off any extra glue.

Have fun!

Monday, September 21, 2009

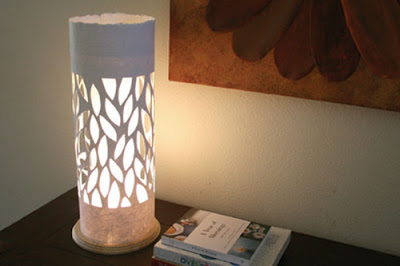
Tutorial: Falling Leaves Paper Lamp


Ok, it's really hot again in San Diego, but let's pretend fall is in the air! Learn how to make this falling leaf lamp by Patricia Zapata over at Craftzine.


Wednesday, August 26, 2009

Mouse Pad Makeover

I've slowly been making changes to my home office to make it feel more harmonious. My latest project was to get rid of my old mousepad and replace it with something that matches the bits of blue I've added the around my desk. But instead of replacing it, I gave it a makeover. Here is how you can do the same with your favorite fabric, a used mousepad and some heat activated adhesive. So easy and rewarding.


Materials:
1 Used Mousepad
Fabric of Your Choice (just enough to cover the mousepad) - I found this one at Joann's
Heat Activated Fabric Adhesive Sheet - I used "Lite Steam-A-Steam2" from Joann's
Scissors
Piping for the edge (optional, and available at Joann's)
Fabric Glue (available at, you guessed it, Joann's)

Process:
1. Remove 1 side of backing from the adhesive sheet and place sticky side down to your freshly ironed fabric on the non-printed side.


2. Place your mousepad on the adhesive sheet and trace.


3. Cut the fabric, with the adhesive sheet stuck to it, along the traced shape of the mousepad.


4. Peal the 2nd backing off the adhesive sheet, leaving the adhesive behind.


5. Carefully place your mousepad onto the newly exposed adhesive sheet. Your fabric is now loosely and temporarily adhered to the mousepad.
6. Flip the mousepad so the fabric side is up and iron 10-15seconds in each area across the surface (follow instructions on the adhesive sheets you buy)


7. Trim off any excess material along the edges. Your mousepad should now look something like this. You can stop here if you'd like.


8. To disguise any freyed edges or crooked cuts, add some piping. Glue around the perimeter with fabric glue. Make sure your piping doesn't sit too much above the surface of the mousepad or it will be annoying when you are mousing.


8. Trim any excess material on the piping as needed so your mousepad will sit flat.


Your finished mousepad with piping will look something like this:


Tuesday, August 25, 2009

New Uses for Old Stuff: Security Envelopes

There are so many good craft ideas involving recycled Security Envelopes. Here is just a sampling of what's out there:

Make office magnets like these from Reconstruct:


Build a miniature house at this chicken


Make these business card holders. Get details via Craftzine


Learn how to make these pendants with security envelopes and old eye glasses via Craftzine:


Still want more?

Make inside out security envelopes at Design Sponge
Make paper beads at Dollar Store Crafts
Make a book like this one from Leacorwin

And finally, feed someone else's security envelopes craft needs with the button for envelope exchange at sweetiepiepress:


Wednesday, August 5, 2009

Craft S'il Vous Plait

My French Mother-in-Law recently exposed me to some great French crafting & decorating resources including the online women's magazine Journal des Femmes. Now my French isn't that great, but fortunately with all the great step-by-step photos, I can easily follow the Journal de Femmes' tutorials. One of my favorites is "Relooker un Store Bamboo" or Makeover a Bamboo Shade:


Incroyable! Get the step-by-step tutorial (in French) here. Need translating? Post a comment or send me an email! Merci beaucoup Danielle!

Friday, July 31, 2009

Tea and Crafts Party

Ok, so I know what you're thinking: Tea Party, seriously? I have to admit, I wasn't too gung-ho when I got my first tea party invitation earlier this year. But it really turned out to be a blast! In fact, I had so much fun, that I hosted a tea & crafts party with my mom & sister a few months later. The first thing you have to realize is that it's not about tea or how you hold your pinky finger (at least not the ones I've been to). It's about being together and doing something creative. Everything from wearing a ridiculous outfit you normally wouldn't be caught dead in, to making a tasty treat to share with friends, to using a new crafting technique (sporting an English accent for the day is optional :), is a way to express your creativity. Tea is just an excuse. A good excuse? That's up to you to decide. To help you, I am sharing a few fun Tea Party related items and projects!


This is our table all ready for the Tea Party!


Stuff to Bring: Hostess Gifts


  • Why not bring your hostess a tea related gift, like tea towels or tea art? I bought this print from Etsy Seller YumiYumi for my cousin Erica who hosted a wonderful tea/birthday party earlier this year:
Stuff to Wear:


  • I needed something to protect my ruffles and lace while crafting so I picked up this fabulous apron made from a recycled skirt at new Etsy shop ForgetMeNotFashion:


Stuff to Make:


  • Mentioned in an earlier post, these decorated Tea Tins from CraftStylish are easy tea-themed craft. Tutorial included!


  • Inspired by a Coaster Tutorial at Curbly, these Trivets are perfect for a pot of tea!


  • My mom made some really cute Cakestands & Pedastals like these from Tangarang.blogspot.com to hold all our cute party food and finger sandwhiches. Sounds like a perfect New Use for Old Stuff! Tutorial included!


Stuff to Give:


  • My mom also made 6 different little felt dresses and put them at each of the place settings on the table. Each one had it own personality and was kind of like a place card in way, except we each got to chose our own and take them home as a party favor. Isn't she crafty? Inspired by the book called Softies by Therese Laskey, Laurie Frankel, and Laurie Kramer.


Now, I do believe it's tea time dahling! What's your favorite tea inspired craft or party idea?