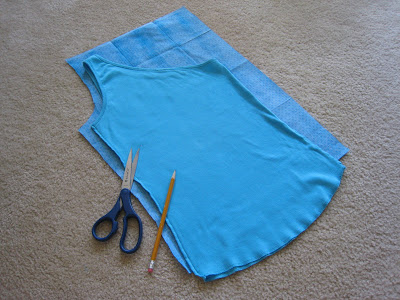
Home
Showing posts with label New Uses for Old Stuff. Show all posts

Sunday, October 2, 2011

Recycle Plastic Bags Into Beautiful Little Vessels


A beautiful, functional new use for old stuff: turn those annoying plastic grocery bags into cups, bowls, and vases! Fabulous idea and lots more wonderful images from Supercyclers found via PoppyTalk.

Tuesday, May 18, 2010

New Uses for Old Stuff


Head on over to Real Simple for lots of New Uses for Old Stuff, like these restaurant coasters used as gift tags for a fun wrapping idea!

Wednesday, October 7, 2009

I Need a Sewing Machine


I sent my mom a few crafting books for her birthday and she brought this one down with her during her visit to San Diego this weekend. Sewing Green by Betz White is filled with fun and simple sewing projects using recycled materials. I don't have a sewing machine (yet), but Betz has inspired me to try some felting using recycled wool sweaters along with a little hand stitching. Check out the great reviews on amazon and pick up your copy today!

Tuesday, August 25, 2009

New Uses for Old Stuff: Security Envelopes

There are so many good craft ideas involving recycled Security Envelopes. Here is just a sampling of what's out there:

Make office magnets like these from Reconstruct:


Build a miniature house at this chicken


Make these business card holders. Get details via Craftzine


Learn how to make these pendants with security envelopes and old eye glasses via Craftzine:


Still want more?

Make inside out security envelopes at Design Sponge
Make paper beads at Dollar Store Crafts
Make a book like this one from Leacorwin

And finally, feed someone else's security envelopes craft needs with the button for envelope exchange at sweetiepiepress:


Wednesday, August 19, 2009

A Better Camera Bag

I reluctantly sign up for membership cards, but at least I got this cute little bag with the one I signed up for last time I went to the mall. My camera fits inside it perfectly and it's definitely a better alternative to the bulky black one I have now. Does anyone out there make or sell camera bags in fun fabrics like this??? Post a comment.


Friday, July 31, 2009

Tea and Crafts Party

Ok, so I know what you're thinking: Tea Party, seriously? I have to admit, I wasn't too gung-ho when I got my first tea party invitation earlier this year. But it really turned out to be a blast! In fact, I had so much fun, that I hosted a tea & crafts party with my mom & sister a few months later. The first thing you have to realize is that it's not about tea or how you hold your pinky finger (at least not the ones I've been to). It's about being together and doing something creative. Everything from wearing a ridiculous outfit you normally wouldn't be caught dead in, to making a tasty treat to share with friends, to using a new crafting technique (sporting an English accent for the day is optional :), is a way to express your creativity. Tea is just an excuse. A good excuse? That's up to you to decide. To help you, I am sharing a few fun Tea Party related items and projects!


This is our table all ready for the Tea Party!


Stuff to Bring: Hostess Gifts


  • Why not bring your hostess a tea related gift, like tea towels or tea art? I bought this print from Etsy Seller YumiYumi for my cousin Erica who hosted a wonderful tea/birthday party earlier this year:
Stuff to Wear:


  • I needed something to protect my ruffles and lace while crafting so I picked up this fabulous apron made from a recycled skirt at new Etsy shop ForgetMeNotFashion:


Stuff to Make:


  • Mentioned in an earlier post, these decorated Tea Tins from CraftStylish are easy tea-themed craft. Tutorial included!


  • Inspired by a Coaster Tutorial at Curbly, these Trivets are perfect for a pot of tea!


  • My mom made some really cute Cakestands & Pedastals like these from Tangarang.blogspot.com to hold all our cute party food and finger sandwhiches. Sounds like a perfect New Use for Old Stuff! Tutorial included!


Stuff to Give:


  • My mom also made 6 different little felt dresses and put them at each of the place settings on the table. Each one had it own personality and was kind of like a place card in way, except we each got to chose our own and take them home as a party favor. Isn't she crafty? Inspired by the book called Softies by Therese Laskey, Laurie Frankel, and Laurie Kramer.


Now, I do believe it's tea time dahling! What's your favorite tea inspired craft or party idea?

Wednesday, July 29, 2009

Create Your Own Indoor Plant Arrangements

I am still on oxygen high from yesterday's post so I decided to look for more indoor plant life possibilities:

Looking for something different than a plant pot? Check out this kickball planter from Instructables via Curbly:


A great New Use for Old Stuff!

I love this beach garden from Sunset Magazine via Craftzine. Depending on what plants you use, you could bring a little piece of the beach indoors:


Monday, July 27, 2009

Reversible Tank Top Beach Tote (No sewing machine required!)

If you're like me, you probably have a lot of stuff in your closet that you never wear. Well here is a way to upcycle those old tank tops into useful and oh-so-cute reversible beach totes. And the best part is, you will not need a sewing machine (which is good, because I don't have one or any clue how to sew)!

Materials:


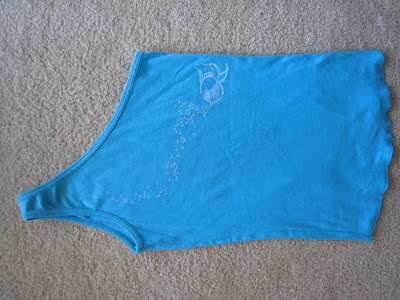
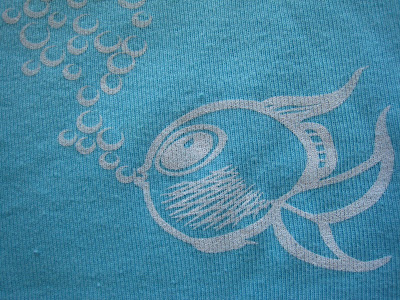
1 used tank top ( This is one I had in my dresser that I never seemed to wear, but just couldn't part with because of the cute fishy design)


Liner Fabric (I used 2 fabrics quarters, available at your local fabric store)


Fabric Glue (I used Fabri-Tac which I was told is the best)

Scissors

Process:


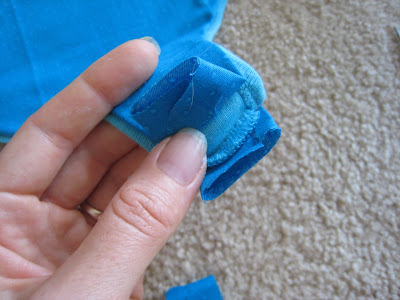
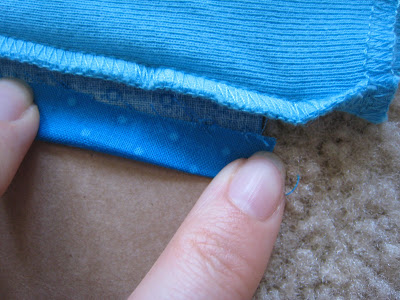
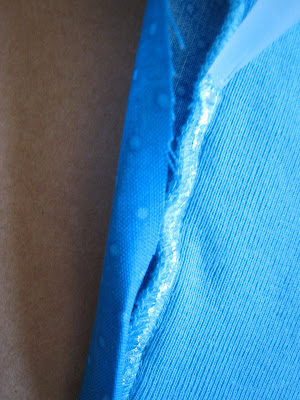
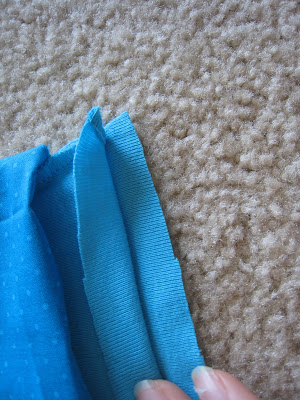
Step 1. Turn your tank top inside out and lay on top of your liner fabric. Cut the liner around one side of the tank top leaving about 3/4 inch margin. Apply a one-onch long bead of glue to the inseam of tank top. Fold about 1/4 inch of the liner material over once and then again to wrap up and over and glue to the tank top. Hold for a few seconds and then repeat up along the entire side of the tank.


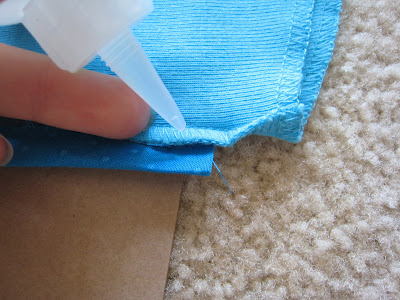
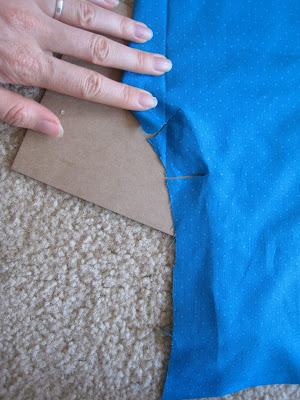
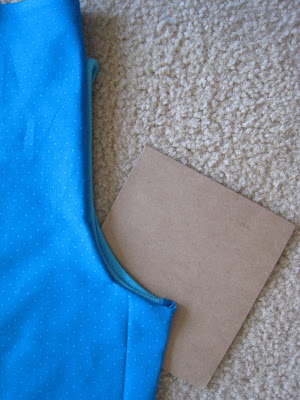
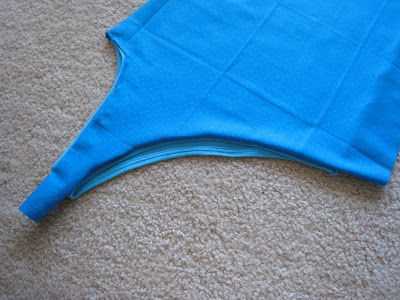
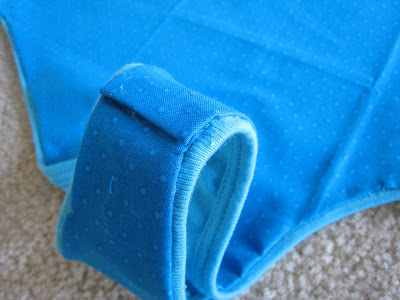
Step 2. Trim the liner material along the arm holes about 1/2 inch beyond the tank. Flip the tank an liner over so the liner material is on top. Then cut some reliefs so that you can fold the material around the curve. Make sure the relief cuts are not too deep or they will show. Cut them just slightly before the fold. Fold the liner material underneath itself along the length of the arm hole to get an idea of how it will look. You can pin it if you want to hold it in place (I did not). Then gently lift the liner in place and place a one-inch long bead of glue on the hem between tank top and liner. Repeat to the shoulder. Leave about 3/4 inch excess material at the shoulder. We will finish this step at the end.


Step 3. Repeat step 2 along the neck-line and second arm hole. My tank was a one shoulder style so, I only had one arm hole to do.


Step 4. Make sure the liner material is laying nice and flat and that there is no slop. Flip the tank and liner back over (tank side up) and Repeat step 1 for the second side of the tank top.


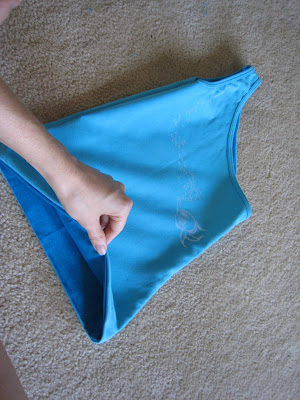
Step 5. The second side of the bag: Lay the 2nd piece of liner fabric on to of the unlined side of the tank. This is almost like step 1, except you only need about a 1/2 inch margin of fabric liner cut along the side of the tank top because you will only fold the material underneath itself once much like step 2. Continue along the side of the tank.


Repeat steps 2 & 3 and 4 to complete the second lined side of the bag.


Step 6. Finish the shoulders by folding one side of the liner under itself and gluing to the inseem of the tank. On the other side of the tank, fold the liner under itself and glue to the other side of the liner. Repeat for second shoulder.


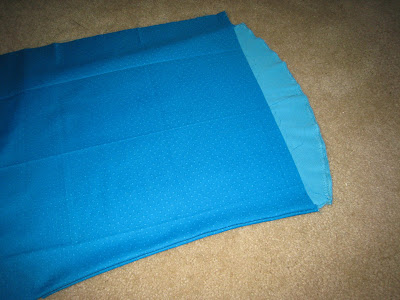
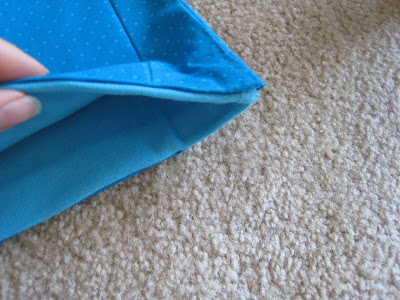
Step 7. Finish the bottom. With the tank still inside out, trim the liner and tank to the same length. Roll up the liner so you can work with the tank material (It's ok to detach the glues seam a little if you need to). Fold about a half inch of the tank over onto itself. Then bring the liner back down over the tank and fold underneath. Gently lift the liner up and apply a bead of glue between the two materials. Repeat across the bottom on each side of the bag.


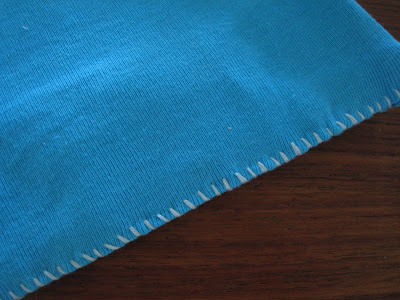
Step 8. You're almost there! Turn the tank right side out, and sew a blanket stitch along the bottom to give it a super strong and decorative finish.


The key to this project is to fold the fabric in such a way that you never see the fabric glue. If you do this successfully, you will have a completely reversible design!

Thursday, July 23, 2009

More Fun with Cork

Yesterday's post got me thinking about what else we can make from cork. How about this lamp from Design Sponge? So retro-fabulous!


Still after more cork crafts? Check out these other fun projects (some made from wine & champagne corks):

Cork Coasters and Trivets at Design Sponge. DIY project finalist.

Cork Placecard Holders at Craftzine. Great for weddings! The ones shown are plastic, but I know you are crafty enough to make them from real corks.

More corkboard inspiration from WineIntro.com. Would be great in a kitchen.

Cork Keychain Wedding Favors from Craftzine. Tutorial included!

Friday, July 10, 2009

New Uses for Old Stuff: Mini Alcohol Bottles

One of the things we put the wonderful bath salts in that we made at the recent tea and crafts party (more on that party soon I swear) was embellshed miniature alcohol bottles. I collected some nice glass ones and put out supplies like decorative tissue paper, ribbon, modge podge, paint brushes, charms, etc. and the girls went to town!


The one my sister-in-law made from a Hendrick's Gin bottle is one of my favorites. Unfortunately, I don't have a picture of that one, but here is my finished product.


I am not a perfume wearing kind of girl, but I think these would also make great fragrance bottles. Email me or post a comment if you know any natural, homemade recipes.

Monday, July 6, 2009

New Uses for Old Stuff: Coffee Containers

Sometimes I like to get creative with gift wrapping, not just the gifts inside the wrapping. I used this coffee can I to wrap up a t-shirt I gave my dad for his birthday:


He thought it was a can of coffee and then, Surprise! It's a really cool t-shirt inside a pretty cool looking coffee can! To elaborate on the coffee theme, I painted the espresso shot with real coffee and mounted it a little off kilter. So even if he didn't have any coffee to drink, he felt like he already had.

Wednesday, June 24, 2009

New Uses for Old Stuff: Printer Paper

I know it's not very green of me, but I still like to print articles rather than read them on the computer screen. But what is green of me, is that I save all my old prints because they still have perfectly good blank back sides that I use as scratch paper or for making grocery lists, etc. But rather than use them in their original and boring 8.5x11 form, why not turn them into cute matchbook notepads like these?:


You can make them as thick or thin and as large or small as you want. I like to use interesting paper for the covers, and with the scrapbooking craze, there is no shortage of cool papers out there. Check out the ones we made at our recent tea and craft party (above) and then go to the tutorial page at Design Sponge to make your own!